Swimlanes
Swimlanes can illustrate how work gets done in organisations where the process involves different departments: the paths they follow, how the Inputs gets transformed into Outputs and where they get transformed and how long the steps should take.
Whether Swimlanes can be used and how they are to be used will be defined in your Process Governance Framework.
Adding Swimlanes
Drag the Swimlane from the stencil and drop it on the page. It will size to fit the page and if a Node is present, the Swimlane will fit inside the Node. By default, there will be 4 lanes.
The Swimlane Properties window will appear.

Properties
Define the Swimlane shape using the following settings:
- Label Height
Proportion of the Swimlane shape given to storing the lane labels. - Layout
Choose whether the Swimlanes appear across the page (Horizontal) or up the page (Vertical). Two lanes can be added to the same page with different orientations in order to generate a grid. - Apply Lane Colour
Automatically shade the lanes with the first 9 colours on the Visio palette. This can be changed by manually selecting a colour for each lane (not recommended). - Sized to Page
Select this option to automatically resize the Swimlanes to fit the page. If a Node is present, the Swimlane resizes to fit the Node. Subsequent resizing of the drawing page also results in the Swimlane resizing appropriately. - Lane Visibility
Choose to display from one to nine lanes. - Lane Width
Set the proportion of the total shape that each lane occupies. Process Navigator will not permit more or less than 100% of the width to be allocated and will compensate by adjusting the last lane appropriately. - Lane Title
Title text that appears in each lane.
TIP: Multiple Swimlane shapes can be dropped onto the drawing page but they will drop on top of another. You will need to reposition them manually.
You can adjust Swimlane settings at any time:
- Select the Swimlane by clicking on a line, label text or coloured box.
- Right-click on the Swimlane and select Properties from the popup menu.
Swimlane Right-click Menu
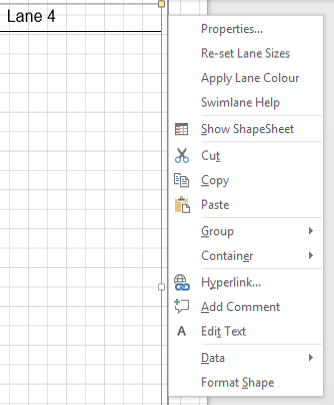
Right click on the Swimlane and the following will appear:
The top four items are Process Navigator-specific, the rest are provided by Visio.
| Menu item | Description |
|---|---|
| Properties... | Provides access to the Swimlane Properties window. |
| Re-set Lane Sizes | When selected, it will restore the default lane dimensions for the number of lanes. |
| Apply Lane Colour | Use this option to apply the default lane colours or remove the lane colours. |
| Swimlane Help | Provides context-sensitive help on the Swimlane. |
Manually Adjusting Lanes
You can adjust the size and shape of each lane by dragging the yellow control handles.
If you need to restore the lane dimensions originally configured in the Swimlane Properties, select the Swimlane, right click on it and select Re-set Lane Sizes from the menu. This command will not remove a colour added using the Format command (see below).
Adding Lane Colours
You can manually apply or remove lane colours.
If you need to enable or disable the lane colours, select the Swimlane, right click on it and select Apply Lane Colours from the menu. Unless you have customised the colours, Process Navigator applies colours according to its default palette.
To change the colour of an individual lane, select the Swimlane and then select the lane.
Right click on the lane and select Format > Fill (Format Shape in Visio 2016) from the context menu. You can apply a colour, pattern, shadow and transparency as required.